Saturday, December 24, 2011

Caramel Popcorn

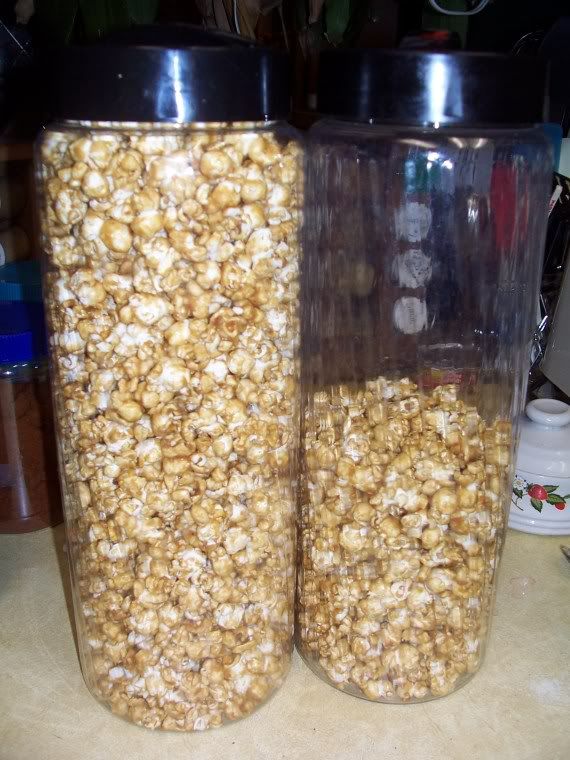
My blog is certainly not complete if I don't include the caramel popcorn recipe!! We have this every Christmas and it only makes it that far because Mom hides it. I do not recommend using microwave popcorn for this - you will not be happy with the results since microwave popcorn tends to taste burned. Use either an air popper or pop it on top of the stove. I prefer Orville Redenbacher and Jolly Time, but we've also had some success in getting big popcorn with some off brands (our latest is the store brand from Fleet Farm). If you've only used microwave popcorn, I recommend starting with at least Jolly Time. While preparing the popcorn, my siblings found that putting the popped popcorn into a paper grocery bag and shaking it really helped to get any unpopped kernels to the bottom of the bag.

As far as the 'large pan', we use either a 12 or 13 quart steel mixing bowl or a waterbath canner. If all you have is an 8 qt stockpot or a 4-5 quart dutch oven, then put 1/2 the popcorn in and add the sugar slurry, mix a bit, then add the rest of the popcorn and stir carefully. When you add the slurry, the popcorn shrinks some, which will leave you more space.

If you have a family member who must severely restrict salt, Mom made this recently with 1/4 tsp. of salt and it tasted fine, however, we are also accustomed to low salt cooking.

Photobucket

This recipe came from Savory Creations, a cookbook by Mercy Employees Assn., Mercy Medical Center of Coon Rapids, MN. There's no date, but I'm sure it's from the 1980s.

Caramel Popcorn

Recipe by Ann Ulrich, contributed to Savory Creations

Pop and have ready in a large pan:
7 to 8 quarts of popcorn
1-2 cups spanish or roasted peanuts, if desired

Dissolve the following at medium heat and boil for 5 minutes:

2 cups brown sugar
2 sticks margarine
1/2 cup light Karo syrup

Remove from heat, and while stirring vigorously, add 1 teaspoon salt. Pour mixture over popcorn and stir. Bake in 200 degree oven for 1 to 1.5 hours. Stir every 15-20 minutes.

Green Beans with Caramelized Onion

You are getting a flurry of new recipes because we've been trying a lot of them. Here is another yummy recipe. I was iffy on it due to the brown sugar, but it is just right. The original recipe uses fresh green beans and I've included that information at the bottom. This recipe is from Southern Living: All Time Favorites c. 2009 p. 321

Green Beans With Caramelized Onion

2 pounds green beans, frozen
2 large sweet onions
3 tablespoons butter, divided
3 tablespoons light brown sugar
1 1/2 tablespoons balsamic vinegar

1. Place beans in casserole dish and heat on high for 20 minutes or until tender.
2. Meanwhile, cut onions into thin slices, and cut each slice in half.
3. Melt 1 tablespoon butter in a large nonstick skillet over medium-high heat, and add onion; cook 8-10 minutes (do not stir). Continue cooking onion, stirring often, 15 to 20 minutes or until golden. Reduce heat to medium; stir in remaining 2 tablespoons butter and brown sugar.
4. Add green beans, and cook 5 minutes or until thoroughly heated. Add vinegar; toss to coat.

Makes 8 servings.

If using fresh green beans, prepare as follows: Trim beans. Cook beans in boiling water to cover 12 to 15 minutes or until tender. Drain and set aside, or cover and chill overnight if desired.

Peanut Butter Popcorn Balls

This was YUMMY. Loved it!! Mom made it. It comes from Taste of Home Winning Recipes, Volume 2 (big 3 ring binder) on page 363. I wouldn't change a thing. I think it has just the right amount of sweetness.

Peanut Butter Popcorn Bars

By Kathy Oswald, Wauzeka, WI

10 cups popped popcorn
1/2 cup sugar
1/2 cup light corn syrup
1/2 cup creamy peanut butter
1/2 teaspoon vanilla extract

Place popcorn in a large bowl; set aside. In a saucepan over medium heat, bring sugar and corn syrup to a boil, stirring constantly. Boil for 1 minute. Remove from heat.

Stir in peanut butter and vanilla; mix well. pour over popcorn and mix until well coated. Press into a buttered 13x9 inch pan. Cool slightly before cutting. yield : 2 dozen.

Calico Baked Beans - perfect for non-cook

I totally love various kinds of baked beans. It's so great to stick stuff into a crockpot or oven and have some tonight and then for lunch and supper the next day while you accomplish some long project.

This particular recipe was from a Lions Club Cookbook. As I get older, I find it a bit too sweet, so if you are serving just adults, feel free to cut the brown sugar to 3/4 of a cup. The original recipe says to use 1 tbsp garlic salt. I think that is a misprint and should have been 1 tsp. garlic salt. I use minced garlic because, well, I like minced garlic and don't feel the recipe needs so much salt.

This recipe also works for the non-cook. Tips for that person are below the recipe. One final tip. Instead of throwing away drained liquid from the various cans of beans, freeze it in ice cube trays or some other container. Use it for gravy or soup.

Calico Baked Beans

By Sharon Thornby

1/2 pound bacon
1/4 cup diced onion
1 cup brown sugar
1 (21 oz) can Boston type baked beans
1 tablespoon minced garlic
1 (15 oz) can lima beans, drained
1 (15 oz) can red kidney beans, drained
1 (15 oz) can butter beans, drained
1/2 tsp dry mustard

Fry bacon. Cook onion in bacon fat. Drain off excess fat. Combine sugar, vinegar, garlic salt and mustard and simmer for 20 minutes. Stir together all ingredients in Dutch oven. Bake at 350 degrees for 1 hour or cook in crock pot on high setting for 1 hour. Serves 12-16.

If you have no dry mustard, use 1-2 tablespoons of yellow prepared mustard.

For the non-cook. Buy precooked bacon and chop. Chop onion. Mix all ingredients together and put in fridge for at least 2-3 hours (even overnight is fine). This allows the molasses flavor to meld into the beans. Remove from fridge and bake or crock-pot for one hour or until thoroughly hot. If using a microwave, use 80% power for about 20 minutes. Stir, then 80% power for another 10-15 minutes until thoroughly hot. If you use full power, it often boils over and that is one heck of a mess.

Wonderful Turkey!!

Whether you use a high temperature and turn every 20 minutes or just put it in a pan and leave it for hours, soaking your turkey in a salt brine will tremendously improve both flavor and tenderness. No more dry turkey! We originally got this recipe by the authors of the Best Recipe in a Nov 9, 2001 USA Weekend article. This book is by the editors of Cooks Illustrated magazine and it surely is the best turkey you will ever taste!

We now use 13 pound turkeys (fewer people) and less salt, but you can do this method on any size turkey provided you can completely cover the turkey. When we did a large turkey (24-25 lbs) , we got one of those big plastic tubs that people fill with ice and pop for parties. Nowadays, we use a large stock pot or the kitchen sink.

Thaw your turkey first. It doesn't have to be totally unthawed as it will continue to thaw overnight. Then the night before roasting, fill your container half way with cold water and one cup of salt and one cup of sugar. If you have a family member who has been told to severely restrict salt, cut this to 1/2 cup of each. Mix well until salt and sugar are dissolved. Place your turkey into the brine and add cold water until it covers the turkey. I usually have to weigh down the turkey to keep it underwater (use a plate and something to weight it down). If you have pets, you MUST cover the whole thing with say a large cutting board. Let it soak for 12-15 hours.

Please note: If you have a very warm kitchen, even at night, you need to place this whole thing in a cooler area or the refrigerator.

When ready to cook, drain the turkey, rinse thoroughly, pat dry and bake as usual. We don't stuff turkey, but do include fresh rosemary in the cavity. Adds a lovely flavor to both turkey and gravy.

I have not included a gravy recipe. Mom has always made the gravy from this recipe and I know she takes out the rosemary, some of the fat and then puts drippings and vegetables into a blender and purees them. Puts into a pan and adds a little cornstarch and water to thicken.

If you have a roaster with a V-rack, here is the recipe exactly from the article. Please note that the cooking time is MUCH SHORTER than a turkey roasted at 325 F (which is what most of us do).

Full-Flavored Roast Turkey

1 1/2 cups kosher salt
1 cup sugar (optional)
1 turkey (11-14 pound) thawed, giblet bag, neck and tail cut off and reserved for gravy. Remove excess fat.
2 medium onions, coarsely chopped
1 carrot, coarsely copped
1 celery stalk, coarsely chopped
3 tbs. melted butter

Mix salt, optional sugar and 1 1/2 gallons of cold water in a clean bucket or stockpot large enough to hold the turkey. Add turkey; refrigerate 12-15 hours. Remove turkey from brine, rinse thoroughly under cool running water and pat dry.
Adjust oven rack to lowest position and preheat oven to 400 F. Place half of the chopped onion, carrot and celery in the turkey cavity. Tie the legs together and secure the wings. Scatter remaining onion, carrot and celery in a large roasting pan. Pour 1 cup of water over the vegetables. Set V-rack in pan. Place turkey, breast side down, on V-rack. Brush back and sides with melted butter. Roast for 45 minutes.
Remove pan from oven. Close oven door. Baste the turkey's back with drippings from the caramelized roasted vegetables, adding a little water to the pan if drippings need loosening. With a wad of paper towels in each hand, turn the turkey on its side so one leg and wing are up. Brush exposed area of turkey with loosened pain drippings. Add 1/2 cup water to the pan. Return to oven and roast for 20 minutes.
Remove turkey from oven; close oven door. Use the wads of paper towels to turn the turkey so the other leg/wing faces up. Baste exposed areas with drippings. Add more water to the pan, if necessary, to keep vegetables from burning. Roast 20 minutes more.
Remove turkey from oven; close oven door. Use the wads of paper towels to turn the turkey
For the third time, remove turkey from oven; close door. Turn turkey breast side up and baste with dripping; roast 35-55 minutes longer, until a meat thermometer inserted in the breast registers 160-165 F. and the leg/thigh registers about 170 F.
Keep checking the pan, making sure the vegetables maintain a rich caramel color; add water if they start to burn.
Transfer turkey to a platter and let rest, uncovered, 30 minutes before carving. Meanwhile, pour excess fat from pan; discard fat and reserve drippings for gravy.
Saturday, December 10, 2011

Wild Rice Casserole

This is a FAVORITE recipe in my family. Mom hasn't made it in ages. This serves a crowd, so consider cutting it in half if you are 4 or fewer. On the other hand, it makes great leftovers the next day. Mom says you can also use 1/2 regular Uncle Bens and 1/2 wild - just partially precook the wild rice portion. Recipe is from Savory Creations, a cookbook by Mercy Employees Assn. at Mercy Medical Center in Coon Rapids, MN. No printing date, but the book came out in the 80s.

Teno's Wild Rice Casserole

1 pound bacon strips
1/2 cup chopped onion
4 cans mushrooms (drained)
1/4 pound butter
2 cubes chicken bouillon
2 cans cream of mushroom soup
2 cans cream of chicken soup
1 pound grated cheddar cheese
1 pound wild rice
2 cans cream of celery soup

Soak wild rice overnight, fry bacon until crisp - drain. Saute onion, drain. Cook rice for 1/2 hour and rinse well. Bake 325 F for 1 hour, top with almonds.

Saturday, December 3, 2011

Fresh Pear Salad

Yep, another recipe from my soon to be gone computer. Loved this. By the way, if you are already baking something for the main course, stick the nuts into the oven for about 8 minutes to bring out the nutty flavor.

Fresh Pear Salad

3 pears, divided use
3 tablespoons lemon juice (divided use)
1 1/2 quarts mixed salad greens, torn
2 tablespoons minced green onion
1/2 cup chopped walnuts
2 tablespoons walnuts
2 tablespoons sugar
1 teaspoon salt
1/4 teaspoon freshly ground black pepper
2 tablespoons red wine vinegar
3 tablespoons orange juice
1/4 cup oil
3 tablespoons mayonnaise

Peel, core and coarseley chop 2 pears. Place in salad bowl and toss with 2 T lemon juice. Add salad greens, onions and walnuts. Toss gently to blend. In small bowl, combine sugar, salt, pepper, vinegar and orange juice. Add oil and mayo. Blend until smooth.

Core and slice remaining pear. Toss with remaining T lemon juice. Arrange pear slices on salad. Garnish with endive and orange slices or fresh raspberries or blueberries, if desired. Pass dressing seperately. 6-8 servings.

A Book Blessing

Here's a quote that was inside a church cookbook I once had. Just thought you might enjoy it.

A blessing be upon the cook
Who seeing, buys this little book
And buying, tries and tests its wares;
And testing, throws away her cares;
And carefree, tells her neighbor cook
To get another such a book.

She considered six professions;
Any one would challenge life,
But she practiced them together,
So they called her 'just a wife.'

Fresh Apple Breakfast Pie

Here's another recipe found on my Mac that I thoroughly enjoyed. This recipe hails from a pre-1970s cookbook. It's a light coffee cake. Refrigerate unused portions and reheat in the microwave. Yum.

Fresh Apple Breakfast Pie

Mrs. Harry Bergman

1 egg
3 tablespoons salad oil
3/4 cup milk
1 1/2 cups Bisquick baking mix
1/2 cup sugar
1/2 cup chopped walnuts
2 large apples, each cut into 12 wedges

Preheat oven to 350 F. Beat together egg, oil and milk in medium sized bowl. Add biscuit mix, 1/2 cup sugar and nuts. Beat briskly with a spoon until well mixed. Turn into buttered pie plate. Arrange apple wedges over batter in a circle. Sprinkle with 2 tablespoons of sugar and cinnamon. Dot with butter or margarine. Bake about 35 minutes or until done. Serve warm.

Swiss Chicken Casserole

I'm in the midst of clearing all needed files (nearly all recipes, but a few knitting as well) off my Mac 6200 CD which is going to go to be recycled. While going through stuff, I rediscovered one of my favorite casseroles. I totally love this stuff! Very easy to make as well. This recipe was submitted by M. Burton on the old ChickenRecipe.com website in1999 (since taken over by AllRecipes.com. I put the recipe as it was listed, but would recommend serving with a salad rather than rice or egg noodles.

Swiss Chicken Casserole

Submitted by M. Burton
A tasty spin on the usual chicken and stuffing casserole. Great served with rice or egg noodles.

6 skinless chicken breasts
6 slices Swiss Cheese
1 (10.75 oz) can of cream of chicken soup, undiluted
1/4 cup milk
1 (8 oz) package herb stuffing mix
1/2 cup melted butter or chicken broth

Preheat oven to 350 F. Coat a 9x13 inch baking pan with cooking spray. Place chicken breasts in pan. Place one slice of Swiss cheese on top of each chicken breast. Combine cream of chicken soup and milk, and pour over chicken breasts. Sprinkle stuffing mix over chicken and soup mixture. Pour melted butter or chicken brother over top. Cover with foil. Bake for 50 minutes or until done.